Dwarsligger
-
Posts
438 -
Joined
-
Last visited
-
Days Won
20
Content Type
Profiles
Microsoft Flight Simulator
SimTogether.com
Download News
Trainsim News
Store
Blogs
Gallery
Events
Downloads
Forums
Competitions
Tutorials
Everything posted by Dwarsligger
-

Update over het stoppen van SimTogether
Dwarsligger replied to etienne123's topic in Announcements & News
Dat kon niet. Etienne gaf geen antwoord als je overname wilde bespreken. Waarschijnlijk omdat hij al met SimTopia bezig was, maar dat geheim moest blijven. Yes, but don't pretend like this could not have been avoided. This is happening because the admin wants it to happen, and not for any other reason. Emotionele chantage. Nice... En het antwoord is "ja", dat zie je toch? -
Update over het stoppen van SimTogether
Dwarsligger replied to etienne123's topic in Announcements & News
Nouja, als je etienne een bericht stuurt waarin je interesse toont, krijg je geen antwoord, dus ik denk eerder dat er geen behoefte aan is. -
Check je PM
-
Als je de Thalys skins voor de TGV bedoelt, deze waren oorspronkelijk afkomstig van rail-sim.de Als je ze daar ook niet kan vinden, stuur maar even een PM.
-
Stoppen met TSC en stoppen met ondersteuning van vragen
Dwarsligger replied to Sjef61's topic in Announcements & News
Ook ik wil je graag bedanken voor alle hulp. Zonder jou had ik waarschijnlijk nooit van de grond gekomen qua lua. Ik wens je veel rust tijdens je "pensioen". -
Kan je een screen laten zien? Ik heb die route destijds heel vaak gereden, maar heb geen flauw idee wat je bedoelt...
-
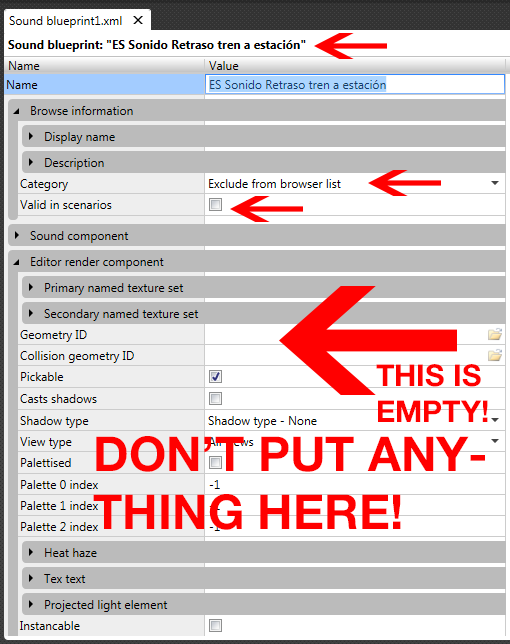
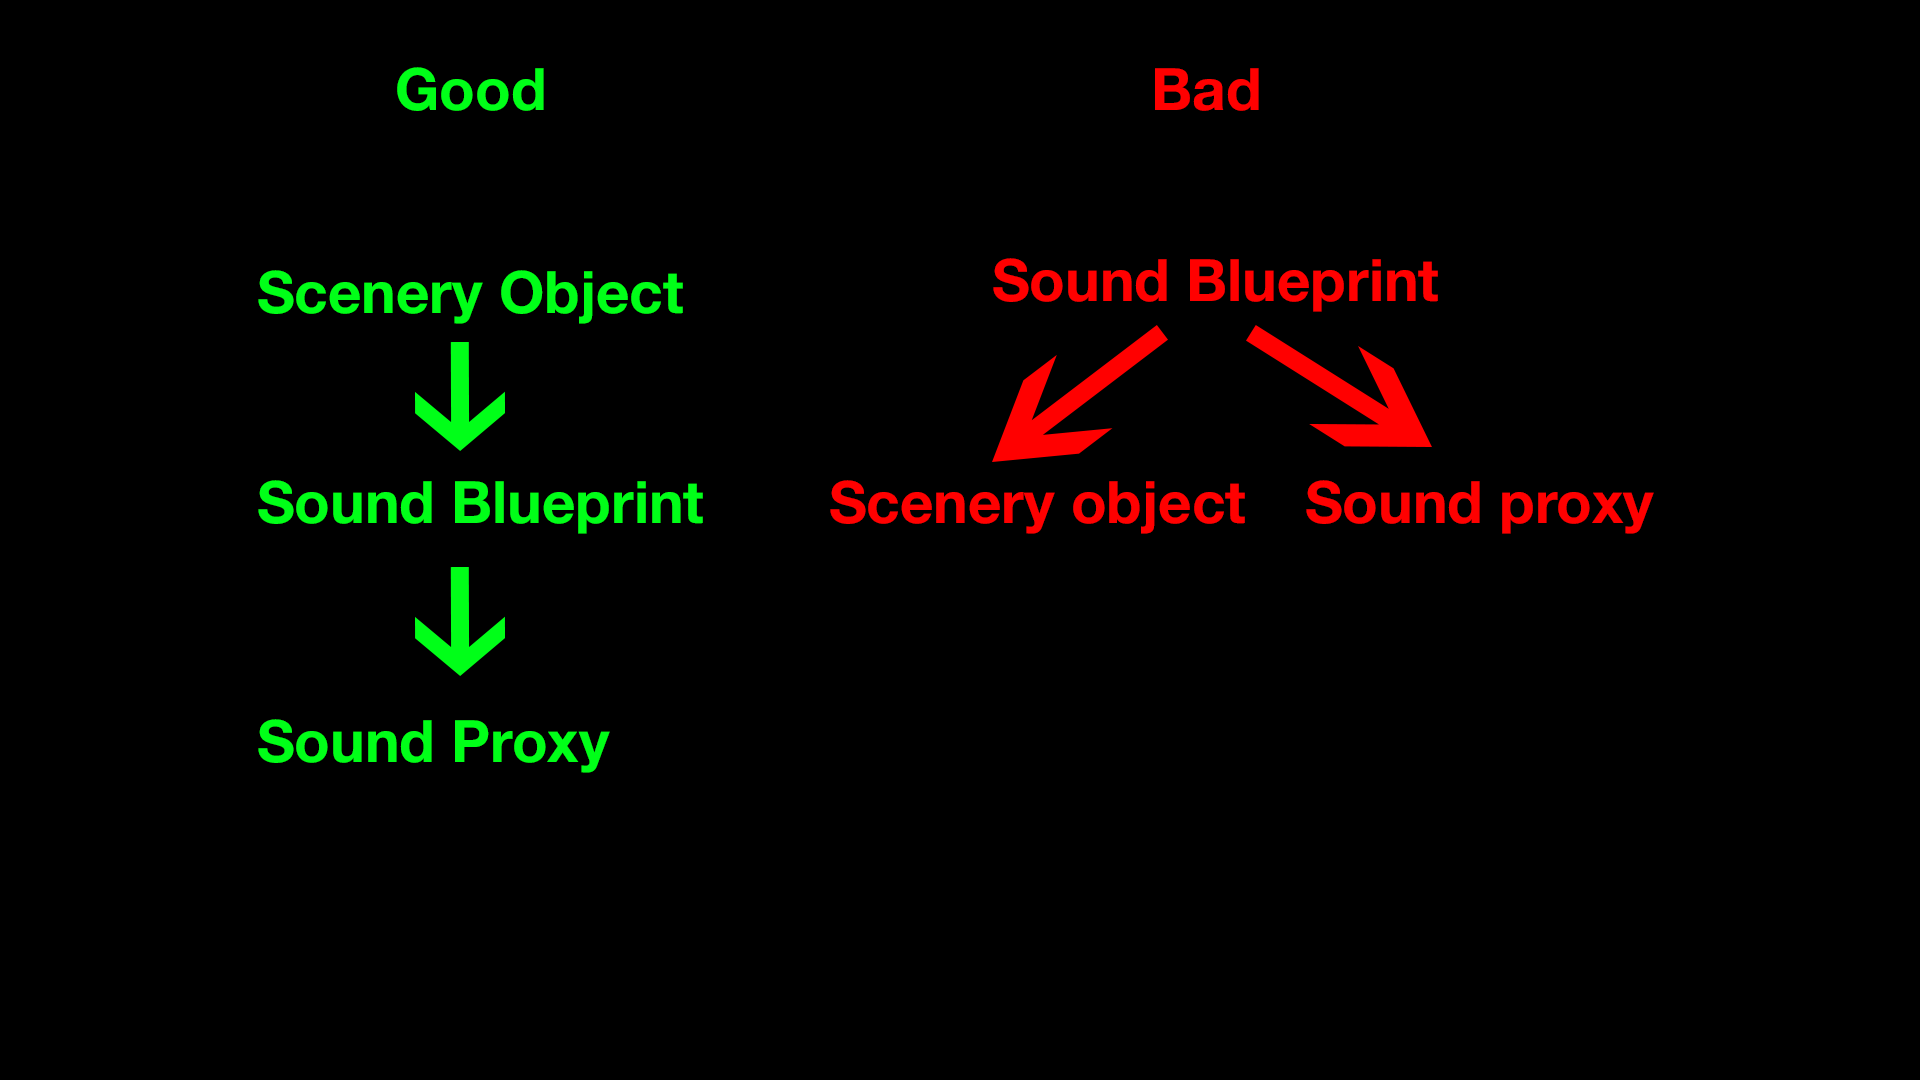
Now place it in the route editor. Save. When you play the game, the object is gone, isn't it? You can only see it in the Route Editor, right? And THAT's why you don't enter a scenery object into the sound blueprint!!! If when using my way, the object didn't appear, you are still trying to place the sound blueprint directly instead of the scenery blueprint. Also, your question about Instance Groups? The answer is in your own screenshot, if you just READ. There's a category called "Instance Groups", maybe you should click that open... But who am I kidding? I'm pretty sure you're not going to read this.
-
Sjef, he's asking how to alias to that marker that goes into the geometry field inside the sound blueprint when you make sounds without visual geometry. Meaning he's entering a .igs file into the sound blueprint...
-
If you don't want to give up then just keep reading until you understand. Nothing more I can do for you until you understand the concepts "child blueprint" and "don't add geometry to the sound blueprint if you want it to appear in-game."
-
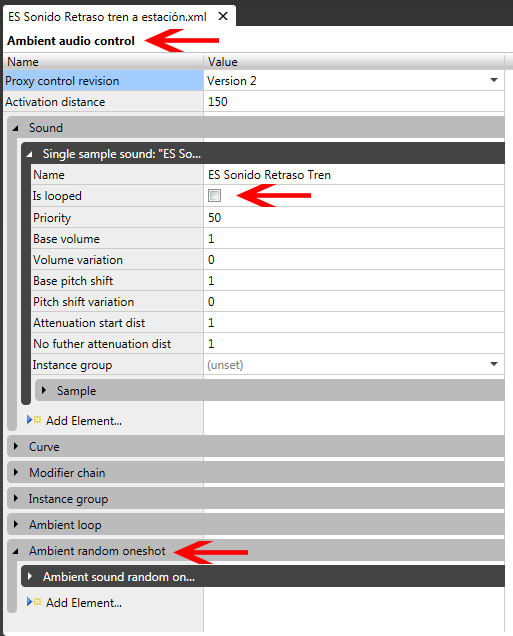
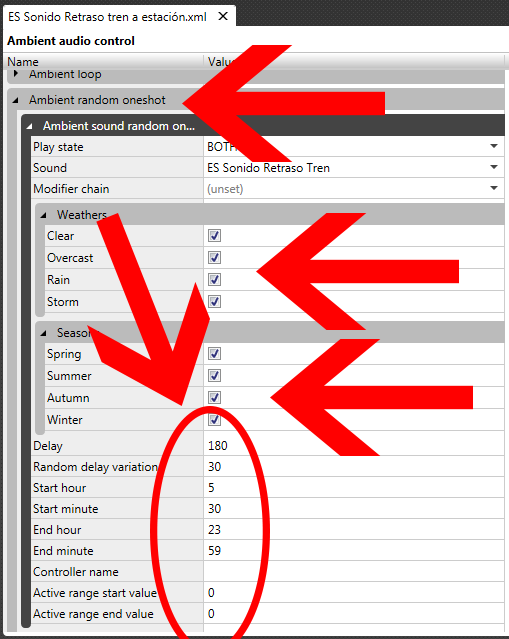
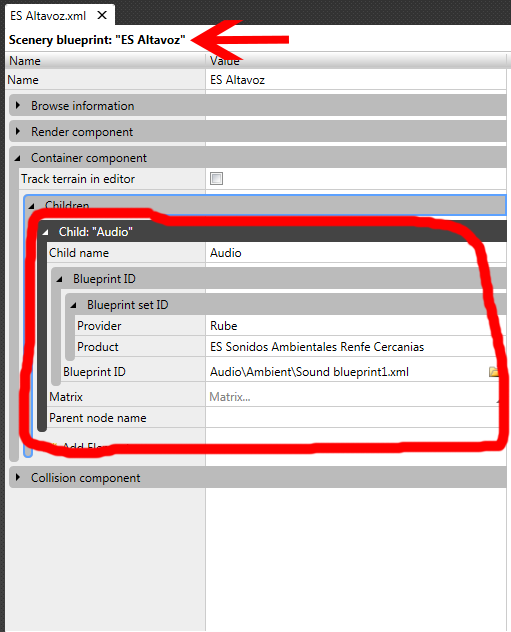
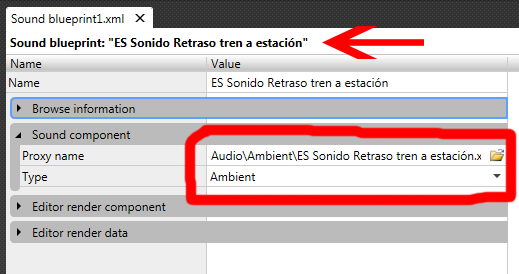
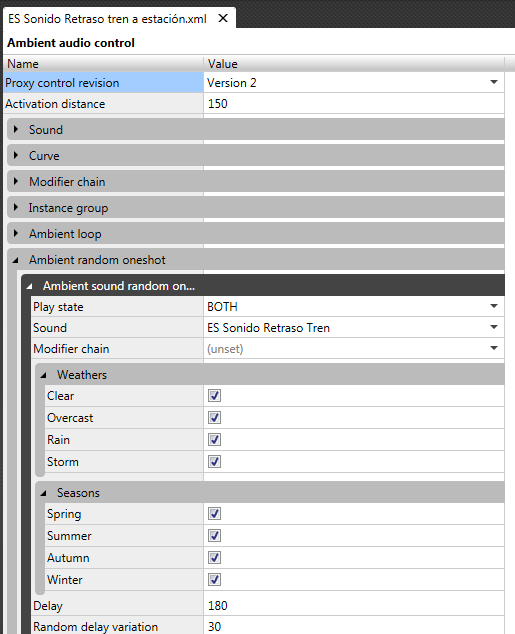
One last time. If you still have questions, don't ask them, but read again. If it doesn't work, you should give up and accept that sound is too difficult for you. Can't show it to you any simpler. STEP 1: SCENERY BLUEPRINT WITH CHILD OBJECT. STEP 2: SOUND BLUEPRINT WITHOUT (!!!!!!!!!!!) IGS FILE Did you put an .igs file in here? If so, remove it. STEP 3: SOUND BLUEPRINT a.k.a. AMBIENT AUDIO CONTROL STEP 4: ENTER CORRECT VALUES IN THE RANDOM ONE-SHOT (last arrow on previous image) I think the arrow might be a bit small, but I hope you see them. Do it exactly like this. If you understand it now, read my first explanation again until you understand it completely. If you still don't understand, give up. Like I said before, I don't want to be a jerk, but you don't understand even the simplest of things. It's very tiring for me to explain things like this. I have nothing personal against you, and I don't want to make you feel stupid, but just READ, for f*#k's sake. Good luck, and remember, if you have questions, don't ask them, but read again! Look at the pictures and try to see what the arrows are pointing to and why that's important. Good luck, and I truly wish you well.

-
XML calls IGS and another XML. That other XML calls the audio. Audio is last in the chain and NOT first. Please read. Carefully examine my files. I can't explain anymore right now. I've been awake for 2 days. I'm going down. Good evening and bye. Maybe I'll show it on video tomorrow.
-
Geometry is the shape that you see in the game. The .igs file What I mean, is what you do, is you add the .igs to the sound blueprint. That is wrong. You add the .igs to the .xml and inside the .xml the sound blueprint is referenced. Just compare with my files and see what is different. Check the screenshots of the 3 steps and pay close attention. I'm tired now. I have to sleep for a bit.
-
Keep reading and compare my files to yours. I think you're doing Step 1 wrong. I think you forget to add the child to the blueprint. In TSC, a blueprint (.xml file) can point to another blueprint. First you make the scenery object, then you point that to the sound blueprint. In STEP 1, take a good look at the Children part, encircled in red. Do you have that in your scenery blueprint, too? The object contains the sound, and not the other way around.
-
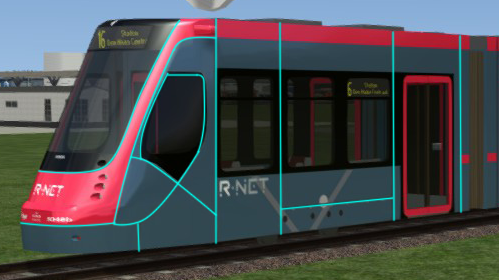
Dat turqoise overtrekken wat ik gedaan heb? Photoshop: path maken met de Pen Tool, control + klik, rechtermuisknop -> Stroke Path. Dikte lijn is afhankelijk van brush size. Uitleg Pen Tool Geef mij de texture anders maar, dan maak ik wel ff snel de normal map om je op weg te helpen. Ook hier: Pen Tool Geloof me, je spul gaat hier zo veel beter van worden. Ik gebruik het ook niet overal op, maar bij materieel en grote objecten is het veel mooier.
-
If you enter geometry there, it will only appear in the editor. That is for sounds without visible geometry. Have you actually studied my files? READ CLOSELY. WATCH THE RED ARROWS AND CIRCLES. PAY ATTENTION STEP 1: STEP 2: STEP 3: I don't try to be a jerk, but it's almost like you don't WANT to understand. .igs in sound blueprint is bad. Kaka. Big no-no. Don't do it. Sound blueprint inside scenery .xml file good. Do it. Epic win!
-
You don't seem to understand this. Keep reading my explanation until you understand. If you have questions, don't ask them, just read again.
-
You are putting geometry in the sound blueprint again. That is wrong. Read my explanation over and over until you understand. This is bad. Don't do it.
-
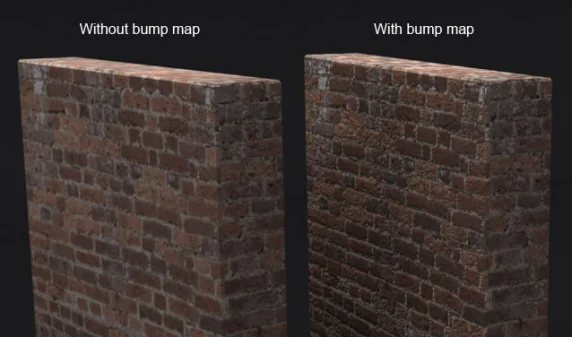
En nou moet je eens proberen die zwarte strepen een normal map te geven. Dat geeft in combinatie met je nieuwe shader een nóg realistischer effect. Ik verwijs naar deze post van mij een hele tijd terug in dit topic: Als je die techniek op deze tram toepast en kan je deze turqoise lijnen een nep-3d geven. Rondom deze lijnen zal je afhankelijk van de stand van de zon dan een beetje schaduw of lichtval zien. En dat is allemaal te doen door slechts een extra texture te maken voor elke texture de de bak gebruikt en een nieuwe shader te gebruiken. Je pakt gewoon de bestaande textures, en je tekent op een nieuwe laag witte strepen over deze lijnen. Dan geef je het geheel een zwarte achtergrond. Je hebt nu een zwarte texture met witte strepen op de plek van deze lijnen. Die exporteer je als normal map naar een .dds bestand waarvan de bestandsnaam eindigt op_nm, je zet hem in Blender in het juiste texture slot en je stapt over op de shader TrainBumpSpecEnvMask.fx en dat was het alweer. Effect is als volgt: Ik zou het toch eens proberen als ik jou was...
-
Exactly. You add sound to the scenery object and not the other way around. Does the file I sent you not work, after all, then? I thought you said it worked.
-
If it works in-game but not in the preview it's probably because in the preview time does not exist and the 180 seconds never start ticking. Congrats on your working sound.
-
Not sure, not home at the moment, so I can't test it right now. Just try and see.
-
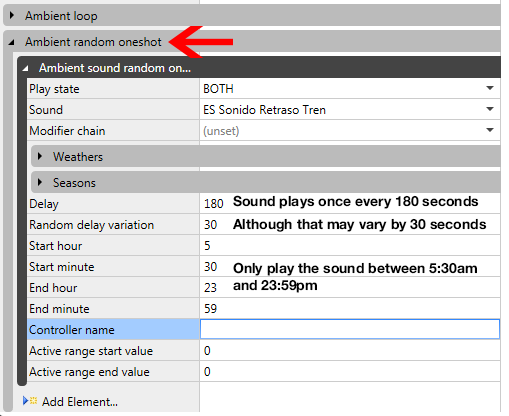
Yeah, that is just a regular ambient sound with a delay. That is done by controlling the steps you see in the second screenshot, like the 180 seconds and 30 seconds settings. So yes, you should be able to do all of that now. Loop = constantly looping sounds (sound is always playing) One-shot = sounds play once every X time with up to X seconds variation (or depending on the controls in case of train audio)
-
What do you mean by "programmed sounds"?
-
Lua is only needed for trains and signals. You won't need it for ambient sounds. I've literally explained all there is to know about ambient sounds in above example. Good luck!
-
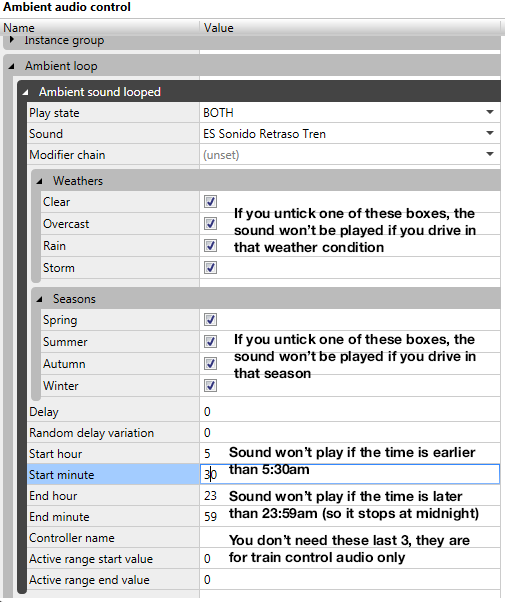
This will work: Source.rar This one plays between 5:30am and 11:59pm in all seasons and all weathers. the sound blueprints and proxy are now correct and set to not appear by itself in the editor, instead, they are now added as a child to the new ES Altavoz.xml blueprint, which is what you select in the editor under sounds. So in the route editor you will select ES Altavoz under audio. If you want to change the name you select in the editorr, change the display name of THAT blueprint. This is what you place in the editor. The sound blueprint is referenced as a child, and that selects the proxy. Do this wrong and it won't even try to play. That was your first mistake. * In these following screenshots, I've acidentally written 23:59pm and even 23:59am in my explanation in the black bold text, that obviously should both have been 11:59pm aka 23:59 in 24hr notation. Just ignore the am/pm part in the bold black text and it makes sense. Your second mistake was to not enable it. You would have needed this: If you wanted a constant looping sound (most annoying woman in the world). But for a station annoucement, once every 3 minutes for instance is better. You would need to untick "IsLooped" in the Audio SAMPLE part at the top of the proxy, remove it from "Ambient loop", and add it to "Ambient random oneshot". So what you actually end up with is this: Don't forget to enable the appropriate seasons and weather types again. You should now perfectly understand how to use normal station annoucements. Bonus round: Now, let's say you want something fancy and want to have a different one for the winter. You would then untick winter in this blueprint and make a new blueprint where you ONLY tick winter. Then you add that blueprint to the scenery blueprint (in this case ES Altavoz.xml) as the second child. Same for rain, and so on and so on. Or let's say you want one blueprint for all weather and all seasons, but you want variation, so you can get a random announcement each time. You would then go to the audio sample part of the proxy and remove the SingleSampleSound and replace it with a RandomSampleSound and add as much samples as you like that can randomly be picked to that. It will then play a different sound each time. You should now understand all there is to know about ambient sounds, have fully mastered them, and be a pro at them. Congratulations.